- Home
- Easy wood carving ideas
- Halloween wood carving
Halloween wood carving tutorial
This candy corn character is quick to carve and fun to make.
Nothing screams Halloween wood carving louder than a quirky, candy-corn caricature with his own candy corn nose!
This little guy goes fast so you can make a whole village of candy corns with different expressions pretty easily.
They will make perfect holiday decorations or fun gifts for the little trick-or-treaters in your life.
Adding a small bag of real candy corn in a gift box will really complete your gift.

What you will need to make this Halloween wood carving
- 1 basswood block (ours is approximately 1 x 1 x 3-inches (2.54 x 2.54 x 7.62 cm), but you can easily make it bigger if you want.
- Wood carving knife of choice (we use a Helvie boxcutter).
- Paint and paint brushes (painting guide provided).
- Pencil to draw on details.
- Carving gloves (always for safety).
Draw your guideline and round the corners of the Halloween wood carving
- You will carve off the corner for this project.
- Draw a line 1.5 inches (3.81 cm) from the top that will be the bottom of the candy corn (photo 1).
- Use push cuts to round all the corners from the top of the block (photo 2). Carve inward to start to create the triangular top of the candy corn. Leave a little mound of wood to create the nose (photo 3).
 1. Guideline is drawn all around
 2. Push cut to round the corners
 3. Setting up the nose and head of the candy corn
 4. Right side view
 5. Left side view
 6. Back view
Separate the body from the legs of the Halloween wood carving
- Using deep stop cuts, separate the bottom of the Halloween wood carving from the legs all around (photos 7,8).
- Tip: It may help to start at the corners and work your way in between them.
 7. Staring to separate the body from the legs
 8. Body is separated from the legs all around
Flatten the front and back of the Halloween wood carving
- Use your knife to flatten the top of the head in the front and back (photo 9).
- Remove the end grain on the top and start to carve the head inward to set up the area for the eyes.
- Draw the eyes and lines for the bottom and top of the nose (photo 10).
 9. Flattening the top of the head on the front and back
 10. Eyes and lines for the nose are drawn
Start the nose of the Halloween wood carving
- Make a stop cut under the nose and remove wood underneath (photo 11).
- Make smile cuts on the sides of the nose (photo 11).
 11. Starting to carve the nose
Shape the nose of the Halloween wood carving
- Draw the guidelines lines for the candy corn nose (photo 12).
- Cut the nose and draw the mouth and two teeth (photo 13).
- Shape the lower lip carefully to avoid crumbling (photos 14,15).
 12. Cut lines are added on both sides of the nose
 13. Nose is cut and mouth and teeth are drawn
 14. Starting the mouth
 15. The face is completed
Flatten the bottom of the Halloween wood carving
- Using your knife, remove wood to flatten the front and back of the body of the Halloween wood carving (photos 16,17).
- Draw lines for the legs (the distance between the bottom and top of the boots is 1/2 inch/1.27 cm). Mark the wood to be removed on the Halloween wood carving (photos 18,19).
 16. Front is flattened
 17. Back view
 18. Mark the wood to remove for the legs
 19. Back view
Carve the legs of the Halloween wood carving
- Using a stop cut, and removing wood from above it, separate the shoes from the legs (photos 20,21).
- Mark area to remove on feet. We will keep them a little thick to support the Halloween wood carving (photos 20, 21).
 20. Legs are starting to take shape
 21. Back view
Narrow the shoes of the Halloween wood carving
- Deeply slice one side of the marked triangle and then the other (photos 22, 23).
- If needed, rock your knife back and forth to get clean cuts (photo 23).
- Mark wood to remove around the shoes (photos 24,25).
 22. Slice the wood to narrow the shoes
 23. First cut is made (repeat on back side)
 24. Mark more wood to remove
 25. Back view
Shape the legs of the Halloween wood carving
- Narrow the front and back of the legs of the Halloween wood carving (photos 25,26).
 25. Legs are shaped further
 26. Back view
Finish the legs and shape the shoes of the Halloween wood carving
- Use a stop cut to split the legs and slice wood off on each side to widen your initial cut (photos 27, 30).
- Shape the feet further and use V cuts to create the heels. Be careful not to slice the shoes off! (photos 27,30).
- Narrow the legs and round off top of shoes (photos 27-30).
 27. Completed carving
 29. Left view
 28. Right view
 30. Back view
Painting your Halloween wood carving


To get this look (all acrylic paints are Craft Smart) for your Halloween wood carving:
- We use a technique called blending (see instructional video below).
- Candy corn bottom band: 2 drops of yellow paint mixed with 2 drops of water.
- Candy corn middle band: 2 drops of Jack o' lantern paint mixed with 3 drops of water.
- Candy corn top band and whites of eyes: 100% white mixed with 1 drop of water.
- Legs and shoes: 2 drops of brown paint mixed with 1 drop of golden brown paint and 5 drops of water.
- Mouth: 2 drops of bright red paint mixed with 1 of dark gray and 5 drops of water.
- Shoes: 2 drops of dark gray paint mixed with 5 drops of water.
- Eyes: draw outline and pupils with black magic marker and add a spec of 100% white paint in each pupil with a toothpick.
- Shoes: dry brush with 100% white paint.
- When dry, finish with a thin layer of FolkArt home decor clear wax.
- Let the Halloween wood carving dry overnight and buff with a cloth.
Halloween wood carving summary
- We've turned a traditional candy corn into an adorable Halloween wood carving.
- This carving goes quickly and is easy to paint.
- It makes a great holiday decoration or Halloween gift.
- You can quickly make other carvings with different expressions.
You might like these
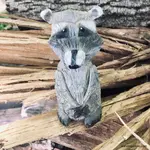
Raccoon Wood Carving With a Knife Tutorial From A Block of Wood
Raccoon wood carving tutorial carved from a block of wood with just a knife and no bandsaw.
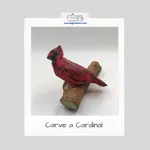
Free Cardinal Wood Carving Pattern
Free cardinal wood carving pattern, step-by-step tutorial, and painting guide are all right here to carve this beauty.
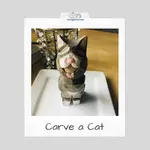
Carving a Cat Using Just a Knife Tutorial
Carving a cat is easy with our step by step tutorial with tons of photos from every angle
Get 50 Wood Carving & Painting Tips when you join our FREE Covered in Chips club.
Share this page
carvingjunkies.com never sells your personal information.
This site uses cookies for its operation and to enhance your experience. As an Amazon Associate and Focuser Carving affiliate we earn from qualifying purchases.
Home | About Us | Privacy Policy | Terms of Use | Contact | Sitemap