- Home
- How to whittle wood
How to whittle wood like a pro
How to get started—and perfect your technique—with fun tutorials.
Curious about how to whittle wood? This guide will provide what you need to know, how to get started, and includes links to some helpful step-by-step whittling projects.
Whittling is the process of using a knife to create objects or designs. It's a relaxing, meditative, and highly creative hobby for people of any age or skill level.
Whittling has been around since the early days of humankind, when people used sharp tools to make practical items from wood, including spears, bows, and arrows. While whittling is still used for these purposes, it may more commonly be used today as a form of enjoyment/entertainment.
Learn more about whittling history here.

How to whittle wood: The difference between whittling and wood carving
Both whittling and wood carving are activities that involve cutting and shaping wood.
With wood carving, you may rely on a full set of tools, including knives, gouges, chisels, and saws.
Purists believe that true whittling involves using only a hand-held knife to cut away small pieces of wood and shape the wood into your desired format.
But it's not like the whittling police will arrest you, if you use a V-tool!
How to whittle wood: What is needed to start
To start whittling, you will need a few important items, including:
- Safety tools: Before you put a knife to wood, you should protect your non-carving hand with a carving glove. Nothing can derail your enthusiasm for whittling more than a cut! I use a leather-lined Kevlar carving glove with a hack that makes it more protective and cushiony (you can read about it here). If you are going to whittle on your lap, please place a flat piece of wood, or a cutting board, across your thighs. If your knife slips (and it will at some point), the knife will hit the wood or board and not the precious arteries in your legs. I used a wooden vegetable bin that protects my legs, holds my stuff, and actually catches most of my chips. Be careful to protect your eyes too, especially when you are first starting out. Those chips can really fly and they are sharp. Also, be mindful of where your knife is at all times. If you are holding your knife at an angle where you think it might be easy to slip, try the cut from a different angle.
 Leather-lined Kevlar glove
- A knife with a sharp blade: While you can whittle with a folding pocket knife, you may prefer using a fixed (non-folding) knife, especially if you are whittling for hours at a time. While some whittlers like a thicker whittling knife (like Moras), I prefer the same knives I use for wood carving (see my suggestions). I also like to cover my knives with quality pipe tubing from the hardware store. Another good practice is covering your knife every time you put it down to avoid cutting yourself when you pick it up. And put your knife down if you need to scratch your head!
- A piece of wood: You can start by whittling small branches of trees (provided the wood is still green). But you may want to try a soft wood, like basswood or pine. I get my wood in bulk from a sawmill, but if you're just starting out, you will probably get your wood from a craft store. If the wood is hard to whittle (or dry)—and you know your knife is super sharp—try spraying a solution that is 50% water and 50% rubbing alcohol to soften it up. Or dip it in boiled linseed oil and let it dry overnight.
- A strop: There is nothing more important than a sharp knife when you are whittling. Stop and strop every 30 minutes or so. You can buy a strop or easily make a strop yourself. Either way, you will need a stropping compound that is used to keep your knife sharp. To learn more about stropping, read this. I personally only need to sharpen my knives (with an adapted belt grinder) a few times a year because I strop them every half hour.


- A good light: You want to be able to clearly see your piece, but more importantly, where your knife is. I like LED lights, but it's really a matter of personal preference.
- A pencil and a ruler: You will use both to mark your guidelines or your design. A magic marker will not smudge, but you will have to carve off mistakes versus using an eraser. When you are finished whittling you can always wash your piece with warm soap and water to remove pencil marks.
How to whittle wood: What cuts to learn
The cuts you use for whittling are the same as the cuts you use for wood carving, including:
- Push cuts: Where you push the knife away from your body to remove wood. Learn more.
- Pull cuts: Where you pull the knife toward your body to remove wood. Learn more.
- Stop cuts: Where you make one cut to create a stopping point for another cut. Learn more.
- Paring cuts: Where you hold the knife like you are going to pare an apple. Learn more.
- V-cuts: A type of cut that creates a V-shaped groove or channel in the wood. Learn more.
- Chip cuts: Also sometimes called pyramid cuts or triangle cuts, where you make 3 cuts—at an angle that meet in the center—to cleanly remove a triangular piece of wood. Learn more.


How to whittle wood: First projects
Keep your first whittling project simple—to help you get the feel of holding your knife—and making cuts. Here are a few step-by-step tutorials that are great for beginner whittlers:
- Whittle a little crooked house
- Whittle a seal tutorial
- Whittle a cat tutorial
- Simple little gnome tutorial
- Big-haired troll tutorial
- Little ring holder tutorial
- Fun alligator tutorial (can be whittled with just a knife)
- Bear whittling tutorial (little more challenging)
Any wood carving pattern can become a whittling project. Simply substitute your knife for other tools used. For example, use a V-cut when a V-tool is suggested. Other whittling projects (from our wood carving tutorials) include:
- Animals—like a dog, cat, bird, or fish.
- Figures—such as a wizard, knight, funny caricatures, miniature caricatures, a little man caricature in the flat plane style, or a snowman.
More fun whittling ideas (simply use your imagination) include:
- Walking sticks: Add decorative elements like a whittled handle or intricate designs on along the stick shaft. Wood spirits are also fun to whittle on a stick.
- Toys: Cars, airplanes, or a boat.
- Kitchen utensils: Spoons, spatulas, or ladles are handy for any kitchen. You can even whittle a spork (combination spoon and fork) for your next camping trip.
- Musical instruments: Whittle yourself a whistle or simple flute.
- A chess set: Be as simple or ornate as your wish. Whittling a chess set will help you perfect your skills and it makes a wonderful gift.

How to whittle wood: One knife or two?
Some whittlers believe that you will get the most consistent results if you make your cuts with the same knife.
I personally like to use long blades (1.5 to 2 inches), but sometimes I will switch to a smaller, detail knife for facial features on a super small whittling project.
How to whittle wood: Cut with the grain
Grain can be just as challenging during whittling as it can be for wood carving. Make a test cut before you start a project. If the knife slides easily—and the wood does not split or chip—chances are you are carving with the grain. If not, turn your piece upside down to carve it.
A rule of thumb is to always cut "downhill" on a project. For example, if you are whittling eyes, start in the middle and work your way down one side. Then repeat on the other side.
 Cut with the grain (right side)
How to whittle wood: Go bigger on details
Like wood carving, make your noses, ears, hands, and feet a little bigger than you normally would when you are whittling. This will give you more wood to shape and refine.
The old adage is once wood is removed, it's gone forever.
 Make your nose twice as big
How to whittle wood: Practice, practice, practice
Like any skill, whittling takes time, practice, and patience. The more you whittle, the easier it will become.
But it's important to not to overdo it and hurt your hands. Take frequent rests—and stretch your fingers often— to avoid hand pain.
Save all your early projects and you will be surprised by how quickly you can progress.
Take your time and enjoy the whittling process!
How to whittle wood: Designing a piece
Once you have been whittling for a little bit, you can consider trying your hand at designing your own whittling projects.
The easiest method is to take a photo of something you want to whittle—from the front, back, and both sides—and use a photo to cartoon-type app to create a pattern that you can tape to your wood block.
Or, you can sketch your pattern to help you visualize the project.
Another method is to use craft modeling clay to create an example of your whittling. After all, whittling is a bit like sculpture.
When you are ready to create your piece, it may help to use your knife to whittle the basic shape. Take your time—and turn the piece from time—to check for symmetry. Then, refine the details with small or short cuts to create texture, curves, and other fine details.
 Start with a picture
 Use a cartoon app to create a pattern
How to whittle wood: Finishing
Painting a whittling project is the same as painting a wood carving. Read this page to learn some great tips and techniques.
Of course, you can also use other finishing techniques after painting, such as wax, boiled linseed oil, or polyurethane spray finishes.
You can also simply stain your whittled pieces with wood stain. Remember to test a little on the bottom first to be sure it's not too dark.
What about sanding a finished piece prior to painting? You can, but be sure you aren't going to use your knife again on the same piece. The sandpaper can leave behind microscopic pieces that aren't kind to knives.
 Acrylic paints work well on any wood
How to whittle: Great whittling resources
Check out YouTube for whittling videos. Gene Messer (who has always been a vocal supporter of this website) has a great beginner's video to carve a little figure. He is a great teacher and patiently takes you through the entire process in two parts.
Also check out our reviews of popular whittling books before you drop your money.
How to whittle wood summary
- Whittling can bring you many hours of joy and a great sense of pride in the work that you create.
- Be sure to protect your hands and lap while whittling.
- Strop your knife often to keep it scary sharp.
- The more you practice the art of whittling, the better you will become.
- Whittling projects can range from simplistic to complex—the choice is up to you.
Get 50 Wood Carving & Painting Tips when you join our FREE Covered in Chips club.
You might like these
How To Hand Carve Wood That You Will Be Proud Of
How to hand carve wood you will be proud of with free tutorials and patterns for use with or without a bandsaw.
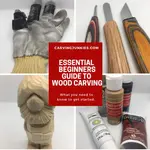
Beginners Guide to Wood Carving Like A Pro
Our beginners guide to wood carving provides all the information you need to become a successful carver.
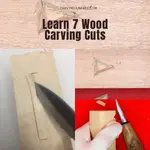
Basic Wood Carving Cuts You Can Master and Use All the Time
7 wood carving cuts you need to learn to get great results time after time.

%20and%20you%20will%20get%20%E2%80%9C50%20Wood%20Carving%20%26%20Painting%20Tips%E2%80%9D.)
Share this page
carvingjunkies.com never sells your personal information.
This site uses cookies for its operation and to enhance your experience. As an Amazon Associate and Focuser Carving affiliate we earn from qualifying purchases.
Home | About Us | Privacy Policy | Terms of Use | Contact | Sitemap