- Home
- Carving wood animals
- How to carve a frog
How to carve a frog with warts and all!
You can quickly carve this cute, big-mouthed frog.
LEVEL: SOME CHALLENGES
Want to learn how to carve a frog that will make you grin? Our adorable frog sits upon his very own Lily pad.
Just grab a roughout knife and a detail knife and you‘re ready to get carving.

How to carve a frog: Supplies you need
We use a basswood block that is 1 1/2-inches (3.8 cm) wide by about 3 3/4-inches (9.5 cm) high. You will also need a sturdy roughout knife to remove wood, and a smaller, detail knife.
A pencil or pen will come in handy for drawing your guidelines and details. We always recommend wearing a good carving glove for safety.
At the end of this page we provide a painting guide.
How to carve a frog tutorial at a glance
How to carve a frog: Set your guidelines
Draw your first guideline a 3 1/2-inches (8.9 cm) from the top to mark the Lily pad (also the base).
Your second guideline will be 2 inches (5 cm) from the top to mark the bottom of the frog’s head (photo 1).
Your third guideline will be 1/4-inch (4.5 cm) from the top to mark the bottom of the frog’s eyes (photo 1).
 1. Guidelines are drawn
How to carve a frog: Getting started
Round all the corners on the block (photo 2). Separate the base by making stop cuts in each corner and removing wood from underneath. Work your way between the corners until the base is separated all around. Tip: You do not have to cut too deeply at this point. You are just reserving the wood for the Lily pad (base) that you will carve later (photos 2-5).
Start to angle back the head of the frog head on the front and back by removing some wood (photos 3,4).
Roughly sketch the head, legs, and body (photos 2-5). For this design, the eyes and head will be slightly cocked to the left (photo 2).
Note: Frogs have 4 toes on their front legs. We forgot one (oops!) and updated our design later in this tutorial (see photo 20 for reference). You should draw 5 toes on your block.
 2. Front sketch of frog
 4. Left view of frog
 3. Right view of frog
 5. Back view of frog
How to carve a frog: Separate the head
Using a knife, separate the head from the body on the sides and the back (photos 6-9). You will carve the front later.
We use a combination of stop cuts and V-cuts to separate the head. Also, remove excess wood from the sides of the frog (photos 7,8) to begin to shape the rear legs.
Note: Removing this excess wood is the hardest part of carving the frog. You will want to use a sturdy roughout knife.
 6. Progress shot from the front
 7. Right view of frog carving progress
 8. Left view of frog carving progress
 9. Back view of frog carving progress
How to carve a frog: Start the face
Remove some wood from the head on the front of the frog (photo 10) to be able to sketch the face (photo 11).
Also, mark the wood that you will remove on the side of the face (photo 12) and the sides under the back of the head (photo 13).
Photos 14 and 15 show the progress of the frog after this wood has been removed.
 10. Narrowing front of face
 11. Face is drawn
 12. Narrowing sides of face
 13. Wood to remove is marked on back
 14. Front progress
 15. Back progress
How to carve a frog: Shape some details
Cut along the guidelines of the legs on the front of the frog and remove wood from the sides (photo 16). We start by slicing the wood off (photo 17).
Remove wood between the leg lines to shape the chest of the frog. We found it easier to start on the sides and move toward the middle. If the wood splinters, turn your piece around. If removing wood proves to be too challenging, you can use a deep gouge here. If you do not have one, you can always sand any rough cuts later.
Draw the neckline on the front of the frog (photo 18) and separate it (photo 19). We use a V-tool (it’s easier on our hands), but you can use a knife and make stop cuts along the neckline.
 16. Cutting along the guideline
 17. Removing wood from underneath
 18. Neckline is drawn
 19. Cutting neckline
How to carve a frog: Refine the back
At this point, we realized that frogs have 4 toes on their front legs. Fortunately, it was easy to slip in that errant toe (we numbered them for reference in photo 20).
Now, remove wood from the middle of the back down toward the Lily pad to shape the bag of the frog (photo 21).
Also, remove wood from the sides of the front legs to refine the shape of the front of the frog (photos 22, 23). Make a cut that sweeps upward by turning your wrist to get the desired curve.
You may have to turn your piece around to be sure you are carving with the grain. Also be careful not to snap your knife.
Tip: If you experience splintering, make a cut halfway from the top and another cut halfway from the bottom (so they meet in the middle).
 20. Toes on front of frog
 21. Shaping the back
 22. Narrowing sides of legs
 23. Progress shot from the front
How to carve a frog: Set up the back legs
Before you shape the back legs and toes, remove some wood under the back legs to create a little space between the frog bottom and the Lily pad (photos 24,25).
Draw a center line on the back to help you draw the legs on the back (photo 25), which extend around to the front side (photos 26,27). There will be a slight gap between the legs on the back (photo 25).
 24. Removing wood to separate the bottom
 25. Back legs are drawn
 26. Left view of back legs
 27. Right view of back legs
How to carve a frog: Carve the back legs
Using your knife, cut along the guideline you just drew for the back legs (photo 28), removing wood above it. You can use a series of stop cuts, V-cuts, or line cuts (use whatever is easiest for you).
Once the back legs are separated, carve the bottom of the legs at an angle (photo 29). Since the cut lines of the legs on the back can be sharp, you can slice some wood off to flatten them (photo 30).
 28. Cutting along guidelines
 29. Carving at an angle
 30. Creating a flat edge
How to carve a frog: Start the face
Use a sharp detail knife to cut along the guidelines for the eye and remove wood from underneath (or, use a V-tool to outline the eye if you have one).
For the eyes, we use a pull cut (or paring cut) to carve along the guideline. Take your time and be mindful of cutting across the grain (it may help to turn the piece if your cuts start to splinter or crumble).
Once the outline of the eye is complete, remove wood at a downward angle to shape the eyeball (photo 31). Make a small pyramid cut in each corner of the eye for shadow. Also, carve the eyebrow (see progress photo 32). We use a a deep stop cut and slice off a little wood under it.
Use the same process to carve the outline of the mouth and tongue. Once the outline is complete, remove some wood from inside the mouth (around the tongue) so the tongue stands out (photo 33).
Also create a small mound above the nostrils. Create a sweeping motion with your knife above the nostrils (turn your wrist as you cut upward) to create this mound (photo 34).
 31. Carving the eyes
 32. One eye is completed
 33. Removing wood in the mouth
 34. Creating the nose mound
How to carve a frog: Add the hind legs
Draw on the hind legs that curve under the frog (photos 35-37).
 35. Back hind legs are drawn
 36. Right view of hind legs
 37. Left view of hind legs
How to carve a frog: Finish your carving
Separate the hind legs with your knife (photos 38-41). Note: We wet the carving so you could see the fine details.
Round the Lily pad and use a V-cut to make 2 indentations on the front and back (photos 38-41). We also narrowed the chest under the head a bit (photos 38,39).
You will use black paint to color in the nostrils.
 38. Front of unpainted frog carving
 40. Left view of unpainted frog carving
 39. Right view of unpainted frog carving
 41. Back view of unpainted frog carving
How to carve a frog: Let’s paint him
 42. Front of painted frog carving
 43. Left view of painted frog carving
 43. Right view of painted frog carving
 44. Back view of painted frog carving
We wash down our acrylic paints with water (simply put a few drops in a paint well and add water, or take a little paint with your brush into a new well and dip the brush into water until you get the consistency/color you like.
Of course, you may use whatever paint brushes you want and any brand of paint that you may prefer.
Full strength paints are indicated with 100% below:
- Eye rims: 1 drop Folk Art pure orange mixed with 1 drop CraftSmart brown and 1 drop of Ceramcoat bright yellow.
- Pupil: Folk Art black paint (100%).
- Eye dots: Artists Loft titanium white (100%) applied with the end of a round toothick.
- Mouth area and chest: 1 drop of Ceramcoat tawny beige mixed with 1 drop of Ceramcoat leaf green.
- Body: Folk Art bright green.
- Warts: Ceramcoat leaf green (100%) and Ceramcoat bright yellow (100%) applied with the round ends of different sized toothpicks.
- Toes: Ceramcoat leaf green.
- Lily pad: 3 drops Folk Art bright green mixed with 1 drop burnt umber.
- Tongue: Ceramcoat fuchsia and Ceramcoat bright red for highlights.
- Finish: 1 drop of Folk Art antiquing medium (817) added to full well of water.
To learn more about painting wood carvings, click here.
Free frog wood carving pattern
If you prefer to carve your frog with a pattern, photocopy this to size to fit your wood block.

How to carve a frog summary
- Learning how to carve a frog is easy with our step-by-step tutorial
- Our big-mouthed frog is fun to paint with his funky green and yellow warts
- You can blend the paints from dark to light on the body to create contrast and interest
Get 50 Wood Carving & Painting Tips when you join our FREE Covered in Chips club.
You might like these
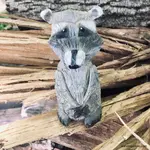
Raccoon Wood Carving With a Knife Tutorial From A Block of Wood
Raccoon wood carving tutorial carved from a block of wood with just a knife and no bandsaw.
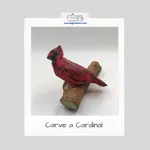
Free Cardinal Wood Carving Pattern
Free cardinal wood carving pattern, step-by-step tutorial, and painting guide are all right here to carve this beauty.
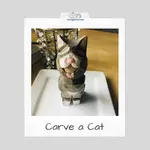
Carving a Cat Using Just a Knife Tutorial
Carving a cat is easy with our step by step tutorial with tons of photos from every angle
%20to%20get%20tips%2C%20techniques%2C%20and%20get%20%E2%80%9C50%20Woodcarving%20%26%20Painting%20Tips%E2%80%9D%20too!)
Share this page
carvingjunkies.com never sells your personal information.
This site uses cookies for its operation and to enhance your experience. As an Amazon Associate and Focuser Carving affiliate we earn from qualifying purchases.
Home | About Us | Privacy Policy | Terms of Use | Contact | Sitemap