- Home
- Easy wood carving ideas
- How to carve a lion
How to carve a lion
With just a knife you can carve this beautiful animal.
Wondering how to carve a lion? Get ready to bungle in the jungle with our simple and easy-to-follow tutorial.
In a couple of hours you can complete this ferocious (not) feline.
This is one of my very early tutorials so it's great for beginners.

What you will need
- 1 basswood block (ours is 1.5 x 1.5 x 4 inches/3.81 x 3.81 x 10.16 cm).
- Pencil (magic marker is optional).
- Carving knife of choice (we use a roughout knife and a detail knife).
- Paint brush and acrylic paints of choice (painting guide at end).
- Good carving glove for safety.
How to carve a lion tutorial at a glance
How to carve a lion step 1: Draw your guidelines
- Draw your first line 1/2-inch (1.27 cm) down from the top (all around) to mark where the bottom of the ears will be (photos 1-2).
- Draw a second line 2 inches (5.08 cm) down from the top (all around) to mark the bottom of the lion's head (photos 1-2).
- On the top of the block, draw a circle to mark the lion's head and the wood to remove around it (photo 3).
 1. Guidelines are drawn (front view)
 2. Guidelines extend all around
 3. Top of the lion's head
How to carve a lion step 2: Round all the corners
- Round all the corners and remove excess wood from around the top of the head (photos 5,6).
- Using deep stop cuts, separate the back of the head from the lower body (photos 4-6). Do not separate the head on the front (reserve that wood for the mane).
- Draw a box on the top of the head on both sides to reserve wood for the ears (photos 5,6).
 4. Stop cut to separate the bottom of the head
 5. Reserve wood for the ears (left view)
 6. Right view
Tip: Strop your knife every 30 minutes to keep it sharp.
How to carve a lion step 3: Cut the ears and round the head
- Using deep stop-cuts, separate the ears (you will shape them later), removing wood from underneath your cuts (photo 7).
- Round the head in the front and the back from your top guideline upward (and between the ears). Also shave off the end grain on the top of the head so paint will adhere properly (photos 8-11).
- Remove some wood to slightly flatten the face in the front and on the back of the head (photos 8,11).
 7. Make a stop cut to separate the ears
 8. Ears are cut, head is rounded, and face is flattened
 9. Left view
 10. Right view
 11. Back view
How to carve a lion step 4: Add the face
- Draw a center line on the front and draw the face of the lion and the mane (photo 12). The mane should be uneven across the front. We use a magic marker so you can easily see the lines (photos 12-13).
- Draw lines for the ears (photo 12), which you will carve last to avoid breaking them.
- Draw the lower body (photo 12). The hind paws extend slightly on the sides (photos 13-14).
- Also draw the tail on the back (photo 15).
 12. Face lines are drawn
 13. Left view
 14. Right view
 15. Back view
How to carve a lion step 5: Define the face
- Start with a stop cut around the outline of the face, and slice wood off from underneath (photo 16).
- Continue to define the outline of the face, eyes, nose, cheeks, mouth, and the top of the mane (photo 17).
- Round down the cheeks (photo 17).
 16. Removing wood under a stop cut
 17. Facial features are defined
How to carve a lion step 6: Define the mane
- Draw lines for the mane on the front and on the back (photos 18,19).
- Define the mane: Make an outer cut first (photo 20) and shave the wood off from underneath your cut (photo 21). We use a detail knife (make some of your lines criss cross as you go, or add more cuts in between your original lines).
- Note: If you have a gouge, you can use it in place of a knife to define the mane.
- Cut the shoulders on the front and the back of the neck (photos 18,19).
 18. Mane lines are drawn
 19. Back of the head
 20. First cut on the outer line
 21. Second cut is underneath
How to carve a lion step 7: Separate and define the front legs and paws
- Use deep cuts to separate and define the front legs and paws (photos 22-24).
- Also separate and define the tail on the back (photo 25).
 22. Define the legs and paws
 23. Front view
 24. Side view
 25. Tail is defined
How to carve a lion step 8: Shape and refine the lower body
- Use a V cut to separate the front legs and further shape the paws and tail (photos 26-29).
- Carve the ears (photos 26,29).
- Clean up fuzzies or deepen cuts prior to painting.
- If the carving is dirty, wash with dish soap and warm water prior to painting.
 26. Lion is ready for painting
 27. Left view
 28. Right view
 29. Back view
Step 9: Paint your lion wood carving


To get this look (all paints are Craftsmart except where noted):
- Underbelly, paws, and lower mouth: 2 drops of Apple Barrel light mocha paint, 1 drop of Apple Barrel white paint, and 5 drops of yellow paint mixed together with 15 drops water. Save leftover paint.
- Cheeks, ears, and body: Add 3 drops of orange paint and 5 more drops of water to leftover paint. Save what is left of this, too.
- Eyes and inner ears: Add 12 drops of Apple Barrel white paint mixed with 10 drops of water to the paint you reserved.
- Nose, mane, and tip of tail: Mix 2 drops of Academy burnt sienna paint with 15 drops of water.
- Mouth: 1 drop of Apple Barrel sunkissed peach paint mixed with 1 drop of Apple Barrel cameo pink paint and 5 drops of water.
- Eyes: black magic marker for eyes and Apple Barrel white paint applied with a toothpick for specs.
- Finish: brush lion with mineral oil and allow to dry. Add 2 coats of polyurethane matte spray to seal. Antique with FolkArt antique medium (plaid) and finish with Howard's Feed-N-Wax.
Free lion wood carving pattern
If you prefer to carve your lion with a pattern, photocopy this to size to fit your wood block.

Summary of how to carve a lion tutorial
- If you want to know how to carve a lion easily, this tutorial takes you through the steps.
- Feel free to change up the colors.
- You can complete this lion with just a knife, or use a gouge for the mane.
You might like these
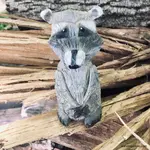
Raccoon Wood Carving With a Knife Tutorial From A Block of Wood
Raccoon wood carving tutorial carved from a block of wood with just a knife and no bandsaw.
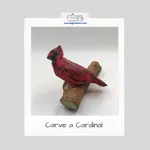
Free Cardinal Wood Carving Pattern
Free cardinal wood carving pattern, step-by-step tutorial, and painting guide are all right here to carve this beauty.
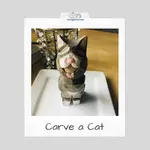
Carving a Cat Using Just a Knife Tutorial
Carving a cat is easy with our step by step tutorial with tons of photos from every angle
%2C%20you%20can%20easily%20carve%20this%20ferocious%20feline.%20%20Free%20from%20carvingjunkies.)
Get 50 Wood Carving & Painting Tips when you join our FREE Covered in Chips club.
Share this page
carvingjunkies.com never sells your personal information.
This site uses cookies for its operation and to enhance your experience. As an Amazon Associate and Focuser Carving affiliate we earn from qualifying purchases.
Home | About Us | Privacy Policy | Terms of Use | Contact | Sitemap