- Home
- Wood carving gnomes
- Whittle a gnome
Wonderful whittle a gnome tutorial
This little guy is perfectly patriotic for July 4th.
LEVEL: EASY
Looking to whittle a gnome? This little whittle makes a wonderful decoration for July 4th festivities with his red, white, and blue hat and heart.
He does not have eyes or ears, which makes him an easy carve. But he is chock full of little details that make him a bit more challenging than your typical gnome pattern.
Just for fun, you can vary the pattern to have him holding a flag instead of a heart.

What you will need for this whittle a gnome tutorial
This whittle a gnome tutorial uses a wood block that is 1 x 1 x 3 inches (2.5 x 2.5 x 7.6 cm).
You can easily go larger if you want.
You can probably get away with using just one knife for this carving. I (Dana) used a straight-edged knife with a blade that is nearly 2 inches, which was perfect for fine details and roughing out the piece.
Keep a pencil or pen handy to do your sketching. A ruler will also help with measuring your guidelines.
I never carve without safety gloves and you should too. Also, remember to protect your lap with a piece of wood or even a cutting board. Accidents do sometimes happen!
Note: A painting guide is provided at the end of the tutorial.
Whittle a gnome tutorial at-a-glance
Watch the key steps for this tutorial in the video below.
Setting up your guidelines to whittle a gnome
Add a guideline that is 1.5 inches (3.8 cm) from the top (photos 1,2). Draw a second guideline that is 2.75 inches (7 cm) from the top to mark the top of the base (photos 1,2).
Reserve a box on the top of the wood block for the curve in the gnome hat, which is 1.5-inches (3.8 cm) long and about 1/2-inch (1.3 cm) wide (photos 1,2).
 1. Front gnome guidelines
 2. Back gnome guidelines
Whittle a gnome: Make your first cuts
Use stop cuts along the guideline to separate the base all around (photos 3,4) and remove wood from underneath. Draw a box to reserve wood for the nose on the front that is 1/2-inch (1.3 cm) square (photo 4).
In the same manner you used for the base, separate the head from the body (photo 5), but do not cut across the box that you reserved for the nose.
Now, separate the nose box all around (photo 8). I pushed my knife around the guideline and carefully sliced wood off from around the box.
Use a push cut to remove wood to shape the hat on the three sides (photos 6,8). Make a stop cut under the box you reserved for the hat curve. Remove wood from underneath, being careful to only carve up to the stop cut (photo 7). You want to avoid slipping and slicing this reserved section off.
Now, mark the wood you will remove to create the hat curve (photo 8).
 3. Making a stop cut
 4. Nose box is reserved
 5. Separating the head
 6. Removing wood to shape the hat
 7. Cutting under the curve in the hat
 8. Wood to remove is marked
Whittle a gnome: Carve some details
Very carefully, make a V-cut to remove wood to create the hat curve (photo 9). If you break the curve (like I did), simply use a little wood glue to reattach it. Since you will paint the hat in stripes (and add deep V-cuts to the hat later) you won’t even notice a break.
Remove some wood to narrow the body slightly all around (photo 10).
Draw on the facial details, heart, arms, hands, and the shoes on the front (photo 11). Also, add the rest of the arms on the sides (photos 12-13).
For those who like to have measurements:
- The arms are about 1/2-inch (1.3 cm) wide.
- The backs of the arms are about 1/2-inch (1.3 cm) long.
- The front sections of the arms are also about 1/2-inch long (1.3 cm).
 9. Carefully removing wood to curve the hat
 10. Narrowing the body all around
 11. Details are drawn on the front
 13. Left side view
 12. View from the right
 14. Back view of the gnome
Whittle a gnome: Carve the nose and front details
Draw a set of triangles to mark where you will remove wood to shape the nose (photo 15). Cut the bottom of the nose at a downward angle (photo 16).
Depending on the size of your nose, you may need to remove some wood—and angle the bottom of the hat—so that it comes up a bit higher on the gnome’s big nose. In photo 17, you can see the cut made on the right side, and the guideline for the second cut on the other side.
Use your knife to cut along the cheek guidelines. Make a second slicing cut to remove a sliver of wood (photo 18).
Make a small pyramid cut to create the mouth (visible in photo 21). Carefully make a stop cut below the mouth, and remove wood from underneath it, to create the lip (also visible in photo 21). Take your time here because the wood can crumble.
Push your knife around the guidelines for the heart and the shoes and remove wood from the sides (photo 19). Then, separate the arms on both sides (photo 20). When you are done, the gnome should match photo 21.
Tip: after you separate the arms you will have greater access to remove wood around the heart and shoes (photo 19).
 15. Shaping the nose
 16. Cutting nose at an angle
 17. Removing wood from the hat
 18. Second cut to remove a sliver of wood
 19. Separating the heart
 20. Separating the arm
 21. Front is carved
Whittle a gnome: Carve the back
Use pyramid cuts to remove wood and shape the back of the arms (photos 22,23). Later, you can remove wood in between the arms.
Draw a guideline on the back of the pants to create a little Y on the tush (photo 23). Push your knife along the guideline on the back of the pants, and make secondary slicing cuts to remove clean slivers of wood (see completed cut in photo 24).
Make a wide V-cut to separate the legs on the back. Draw some clothing details on the back of the gnome (photo 24).
Use V-cuts (or stop cuts) to shape the pants, apron, and shirt on the back (photo 25).
 22. Starting the back of the arms
 23. First pyramid cut is complete
 24. Details are added
 25. Back details are carved
Whittle a gnome: Refine your carving
Make some wide V-cuts on the hat to create facets (completed in photo 26). Vary the length of them (some short and some long). Later, when you paint your gnome wood carving, you can highlight these areas with a slightly darker version of the colors that you are using.
Use your knife (or a V-tool if you prefer) to carve the hair on the mustache (completed in photo 26). Be careful here because the wood may crumble.
Make a cut that is angled downward on each hand, before you start to carve the fingers. Use small V-cuts to carve the fingers (completed in photos 26,28). Also use V-cuts to create the cuff on both shirt arms.
On the front, make a V-cut under each shoe to create some space between the bottom of the shoe and the base (completed in photo 26).
Use V-cuts on each side to create the bottom line of the pants, which are longer in the back (completed in photos 27,28). Also, add a few wrinkles on the pants in the back (completed in photo 29).
Use your knife to round the edges on the base. Be intentional with your knife here so you do not end up cracking the base (completed in photos 26-29).
 26. Front view of unpainted gnome
 27. Right view of unpainted gnome
 28. Left view of unpainted gnome
 29. Back view of unpainted gnome
Whittle a gnome: Get ready to paint
Use your knife to clean up any wood fuzzies, or to deepen cuts, especially in areas where you know you will use a different paint color (for example, between the top of the apron, and the pants, on the back).
Tip: Inspect your wood carving and look for places where you can make small chip cuts in corners, such as the back of the arms, the corners on the inside of the apron, under the nostrils, and under the heart (between the shoes).
Since I like the look of flat plane carving, I flattened the edges on the pants and arms to create more facets that show up well in painting (photos 30-33).
 30. Front of painted whittled gnome
 31. Right side of painted whittled gnome
 32. Left side of painted whittled gnome
 33. Back of painted whittled gnome
Whittle a gnome: To recreate this look
To get the same look for your gnome carving, mix some Academy burnt sienna acrylic paint with water to create a light wash and completely cover your carving (as a base layer).
Then, continue by making paint washes with the colors listed below (always let the paint completely dry between colors):
- Entire gnome (base layer): Academy burnt sienna wash (very thin).
- Cheeks and hands: DecoArt natural buff wash.
- Beard: Apple Barrel dolphin gray (first coat). Dry brush with Ceramcoat black (first) and CraftSmart ivory.
- Stripes: FolkArt steel gray wash, Ceramcoat bright red wash, and Ceramcoat ivory wash.
- Heart stripes: Apple Barrel bright red wash, CraftSmart ivory wash, and Apple Barrel blueberry frost wash.
- Hat bottom rim: Apple Barrel blueberry frost wash.
- Stars on hat and heart: 100% FolkArt metallic sterling silver.
- Pants: Ceramcoat black wash.
- Shoes: FolkArt english mustard wash.
- Finish: Let dry overnight, then brush with boiled linseed oil.
For awesome painting tips, read this.
Whittle a gnome tutorial summary
- You can whittle a gnome to celebrate July 4th or change up the colors completely.
- Want a bigger gnome? Simply increase the size of your wood block and measurements.
- Be careful when you carve the hat curve (wood glue is your friend if it cracks).
- The burnt sienna wash will give your gnome a softer, antiqued finish.
Get 50 Wood Carving & Painting Tips when you join our FREE Covered in Chips club.
You might like these
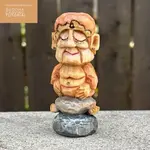
Carving a Buddha Tutorial With A Knife
Carving a Buddha tutorial makes it easy to carve an adorable Buddha sitting on rocks.
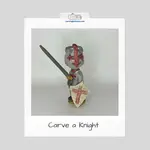
Medieval Knight Wood Carving From a Wood Block Using a Knife
Make a knight wood carving that features a sword, shield, and a tilted head from a block of wood using only a knife.
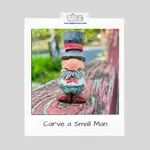
Small Wood Carving Caricature Tutorial
Carve a small wood carving caricature with our easy to follow, step by step tutorial.
Share this page
carvingjunkies.com never sells your personal information.
This site uses cookies for its operation and to enhance your experience. As an Amazon Associate and Focuser Carving affiliate we earn from qualifying purchases.
Home | About Us | Privacy Policy | Terms of Use | Contact | Sitemap