- Home
- Wood carving gnomes
- Gnome carving
Snowboarding gnome carving tutorial
Learn how to add subtle movement to your wood carving.
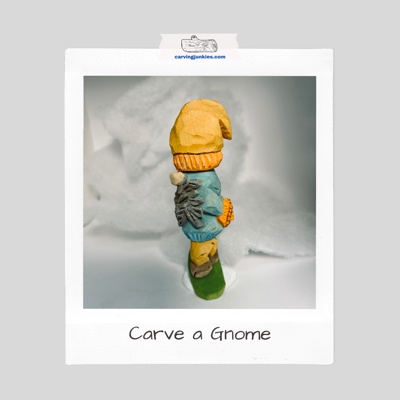
It’s gnome carving time with a colorful twist. Our modern, knuckle-dragger gnome is casually hanging out on his snowboard, with his plaid-mittened hands clasped behind him.
Nothing fazes a snowboarding gnome, including mounds of mountain powder.
What you will need for this gnome carving tutorial
You will need a block of wood. We use basswood that is 1 x 1 x 4 inches (2.5 x 2.5 x 10 cm). To go bigger, just double or triple the size.
You will also need a roughout knife for removing wood, and a V-tool for the beard and knit ribbing on the hat, sweater, and mittens. No V-tool? No problem! You can use a sharp detail knife and make small V-cuts to get the desired textures (just take your time).
Keep a pencil or pen handy to sketch your design (we use magic marker so you will see it better). We also use a fine-tip black magic marker to create the plaid design and to highlight lines on the beard and under the hat (optional).
We carve with a good safety glove and always recommend that you wear one, too. Slips happen to even the best of carvers.
Gnome carving tutorial at a glance
Set up your block for your gnome carving
For this tutorial you will be carving on the corner. Start by rounding all four corners (photos 1-4).
Draw your first guideline 1.5 inches (3.8 cm) from the top to mark the bottom of the hat (photos 1-4).
Draw your second guideline 2.75 inches (7 cm) from the top to mark the bottom of the gnome’s body (photos 1-4).
Your third guideline will start 3 inches (7.6 cm) from the top and will angle down across the front of the block to mark the top of the snowboard (photo 1). Draw a parallel line about 1/4 inch (0.6 cm) below the third guideline to mark the bottom of the snowboard (photo 1). Draw similar lines across the back of the block, but reverse the direction of the angle (photo 4).
Color in a short box on the left side of the front that is about 1/2 inch (1.3 cm) wide (it will extend around the side of the block) and 1/2-inch (1.3 cm) tall to mark the wood that you will remove to separate the snowboard (photos 1,2,4).
Draw a longer box on the right side of the front that is about 1/2 inch (1.3 cm) wide (also extends around the side of the block) and 1 1/4 inches (3.2 cm) tall to mark more wood that you will remove to separate the snowboard (photos 1,3,4).
Draw a final guideline that is 1/4 inch (0.6 cm) from the bottom to mark the base that you will create for stability (the snowboard is at an angle). This final guideline only goes from midway on the front around to midway on the back (photos 1,2,4). This will allow the snowboard to be cut at an angle without the gnome falling over. (Note: We’ll remove more wood above the base later.)
This will all make sense to you as you move through the tutorial! You may want to read through the instructions entirely before you start your gnome carving.
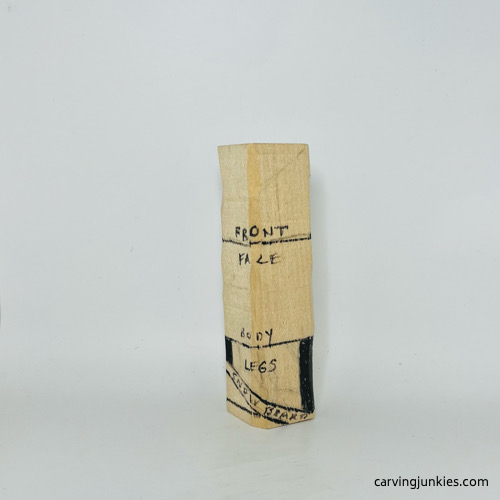 1. Gnome front guidelines
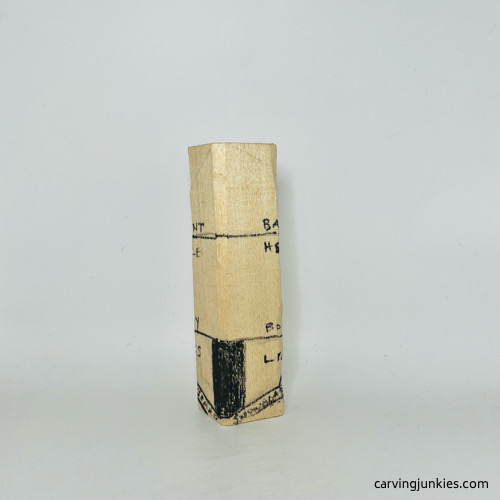 3. Left side gnome guidelines
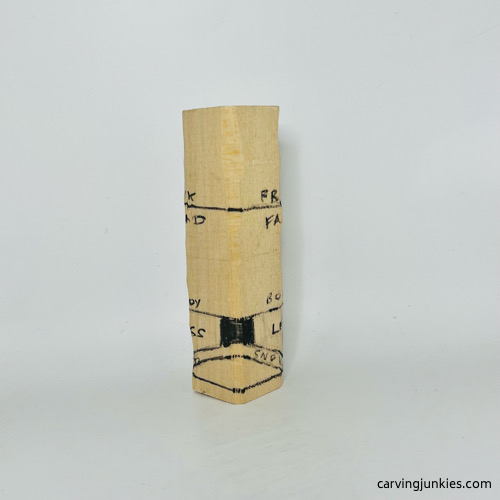 2. Right side gnome guidelines
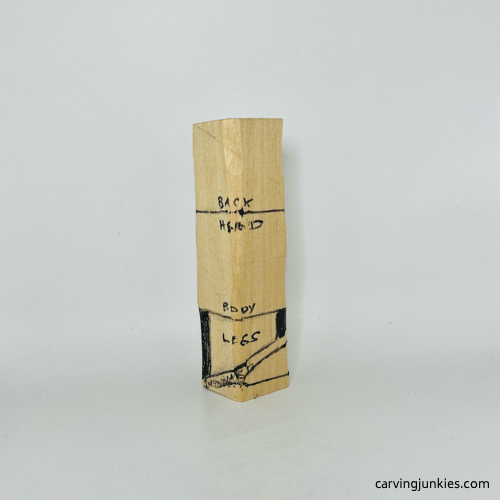 4. Gnome back guidelines
First steps for your gnome carving
The first step is to establish the placement of the snowboard and the gnome’s legs.
Using your knife, separate your second guideline all around (photo 5). We use stop cuts and remove wood from underneath). Tip: It helps to start at each corner and work your way in toward the middle.
Then, use stop cuts to separate the outline of the smaller box (photo 6). This will give you access to start to separate the snowboard (photo 7). Repeat this process with the longer box on the other side (photo 8).
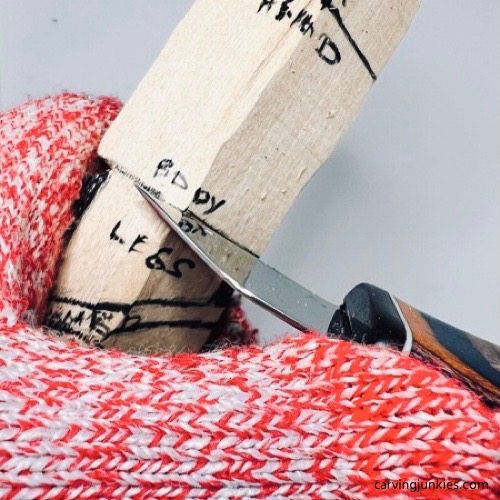 5. Making a stop cut
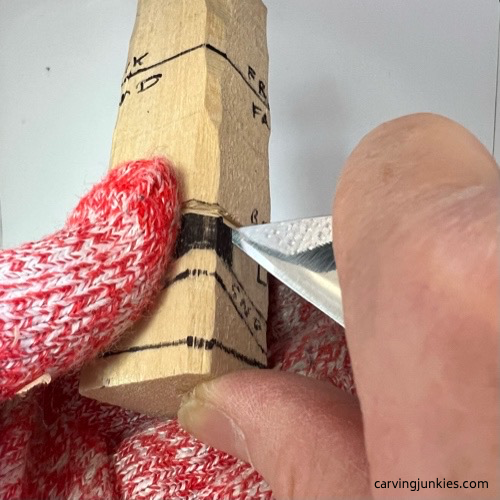 6. Cutting shorter box guidelines
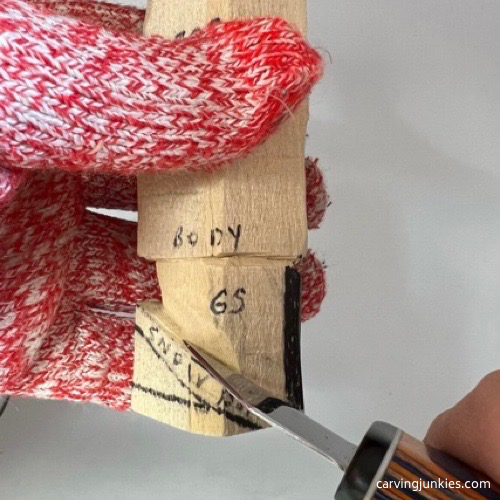 7. Cutting into the snowboard to remove wood
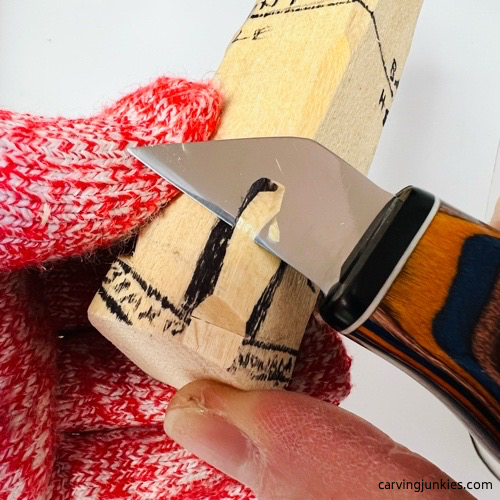 8. Removing wood from other side (longer box)
Separate the base of the gnome carving
Using stop cuts, separate the base of the gnome carving (photos 9,10,12,14). Remember: you are not cutting the base completely around the block. The front of the snowboard will still be attached.
Slightly narrow the width of the wood where the legs will be, and draw on the legs and boots (photo 11). We will draw the back of the legs after we carve the front legs.
Draw a box for the nose that is 1/2-inch wide (1.3 cm) and 1/2-inch tall (photo 11).
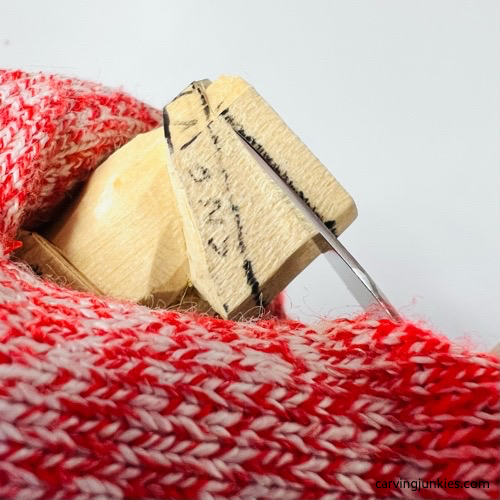 9. Cutting the base
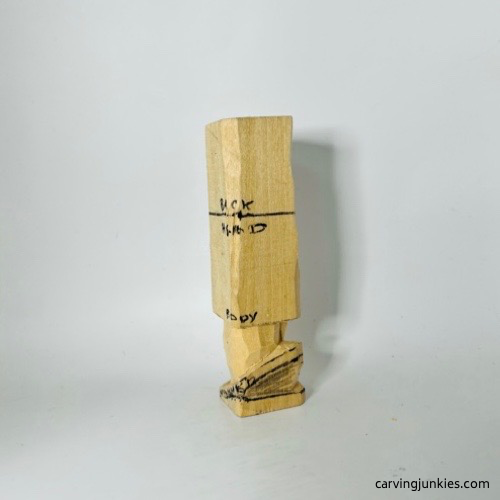 10. Base is cut
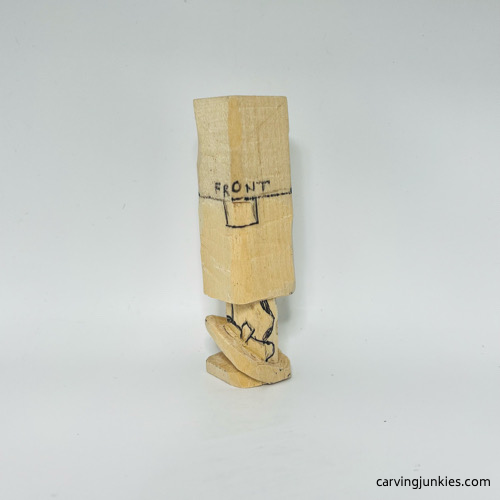 11. Narrowed legs and nose box added
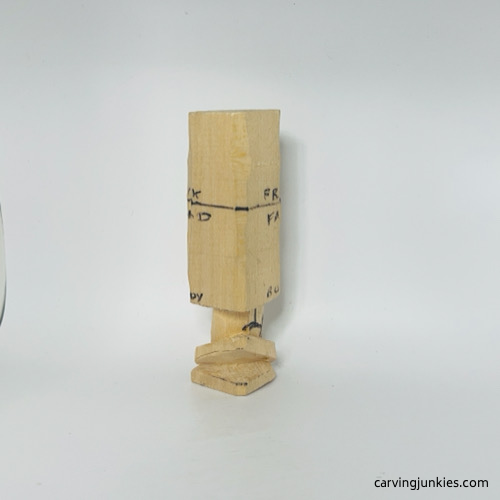 12. Right side progression
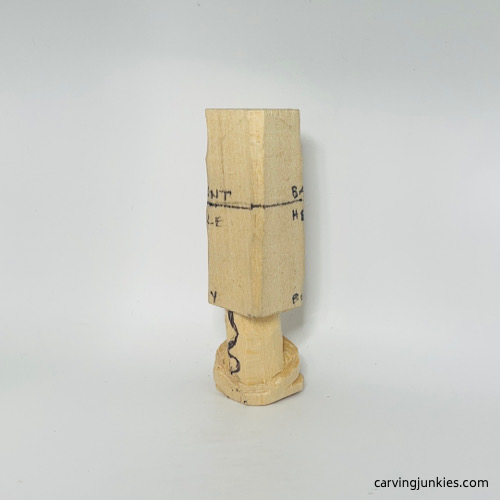 13. Left side progression
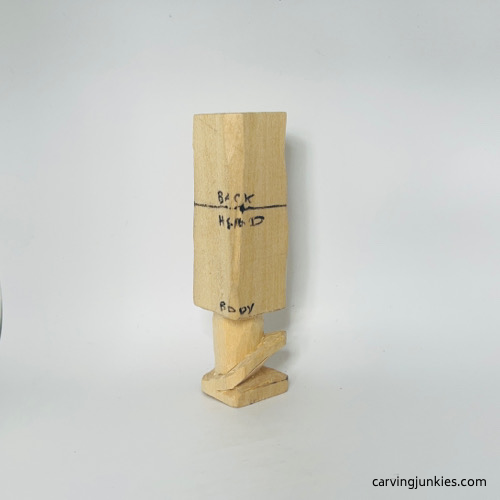 14. Back progression
Add details to the gnome carving
Separate the hat from the head (photo 15). We use stop cuts and remove wood from underneath.
Make a stop cut under the nose and remove wood from underneath (photo 15). On the sides, we use a line cut to separate the nose.
Mark the corners of the nose where you will re move wood to round it (photo 16).
Draw on the beard, arms, and clasped hands (photos 16-19). Also, draw the sides of the gnome sweater (photos 16,19).
Also, mark the wood that you will remove to carve the tassel on the back of the gnome’s hat (photo 19).
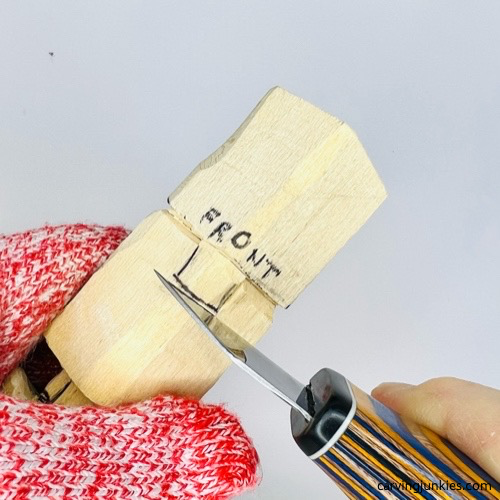 15. Separating the hat and nose
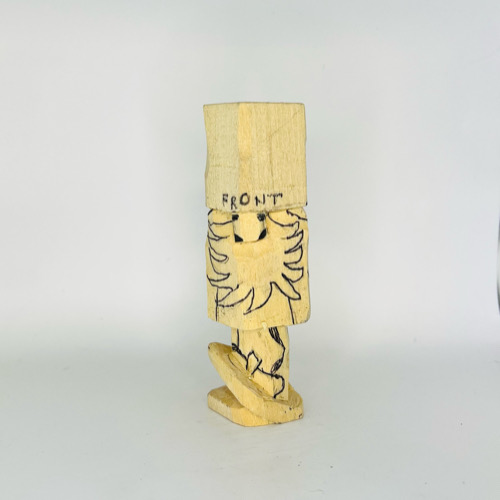 16. Front details are drawn
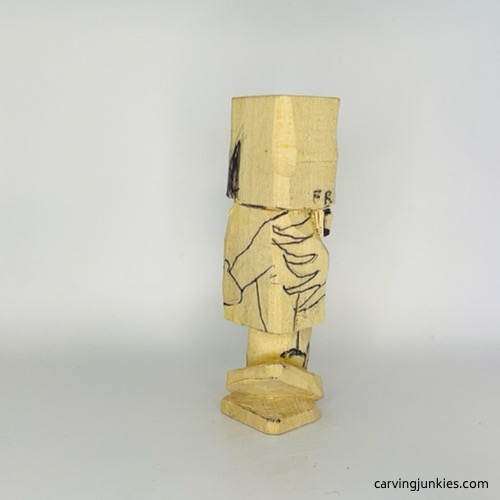 17. Right view of details
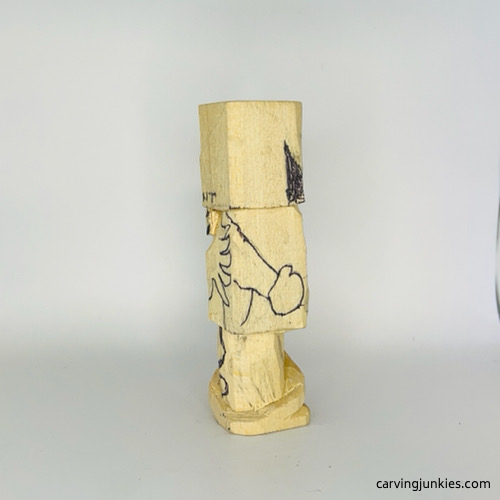 18. Left view of details
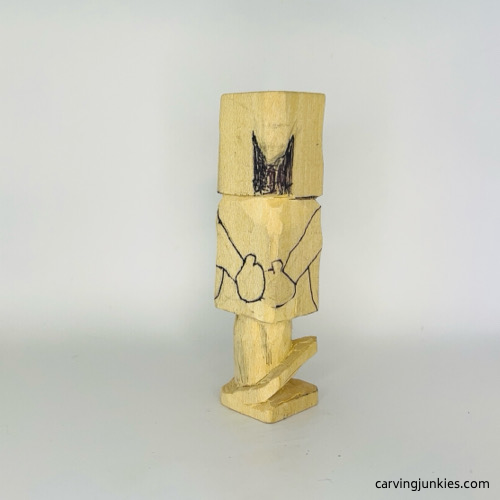 19. Back view of details
Carve the hat on the gnome carving
Shape the hat by carving wood back, starting about halfway up from the bottom of the hat (photo 20). You will also narrow the hat on each side. It is a bit like sharpening the end of a pencil.
Make a stop cut under the tassel on the back of the gnome’s hat and remove wood from underneath (photo 21).
Make a pyramid cut on each side to shape the end of the tassel (photo 22).
Once you have access under the cut tassel, use your knife to remove more wood.
Also, remove wood to begin shaping the gnome’s upper back (photo 23).
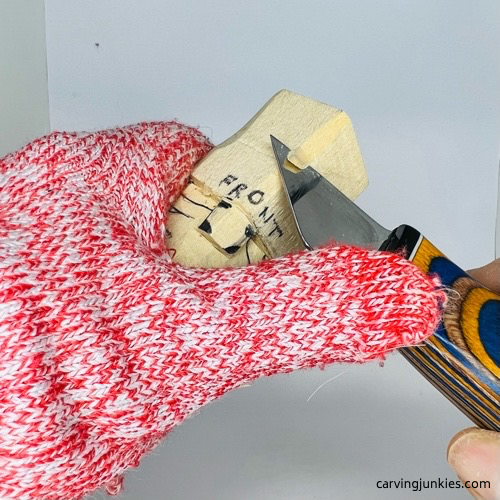 20. Angling the hat back
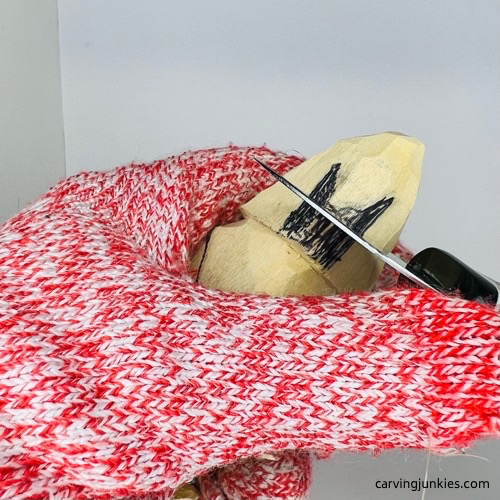 21. Stop cut to start the tassel
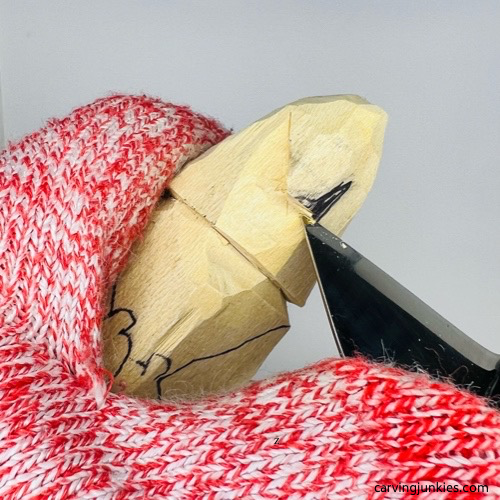 22. Making second pyramid cut
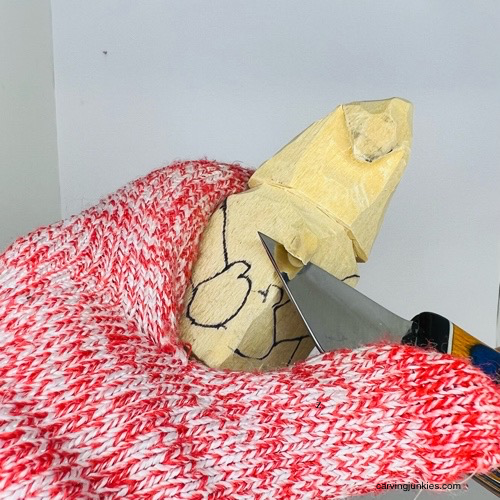 23. Narrowing the gnome’s back
Add more details to the gnome carving
Round the nose by carving off the corners you marked previously. Then, angle your knife to cut the bridge of the nose (photo 24).
Run your knife along the guidelines for the bottom of the beard and remove wood from between your cuts (photos 25,26).
Now, make a stop cut under the arm (photo 26), which will allow you to remove more wood (photo 27) to shape the beard and narrow the gnome’s sweater (photo 28).
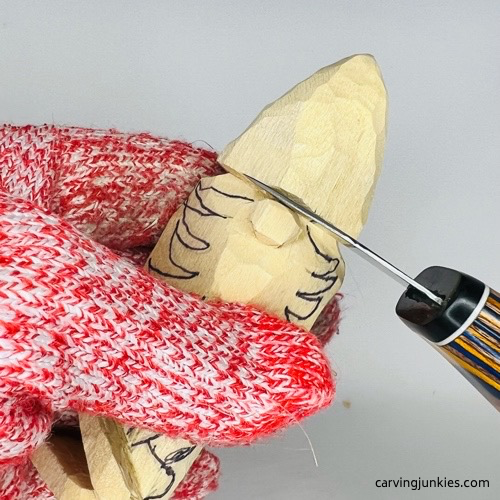 24. Cutting the bridge of the nose
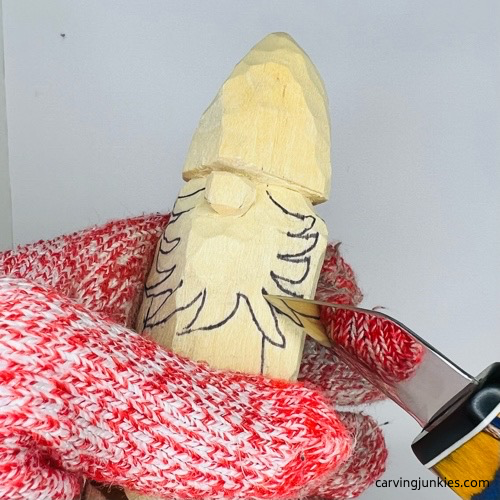 25. Carving the beard
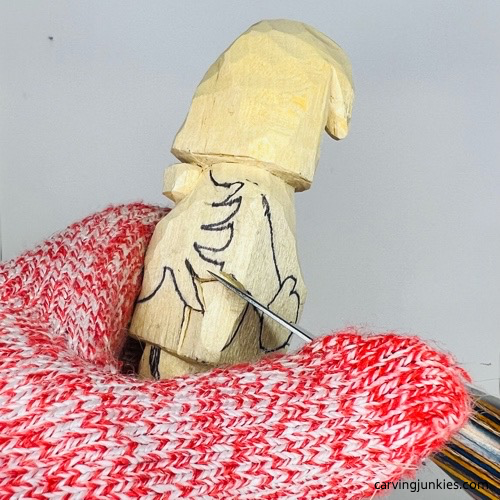 26. Separating the arm
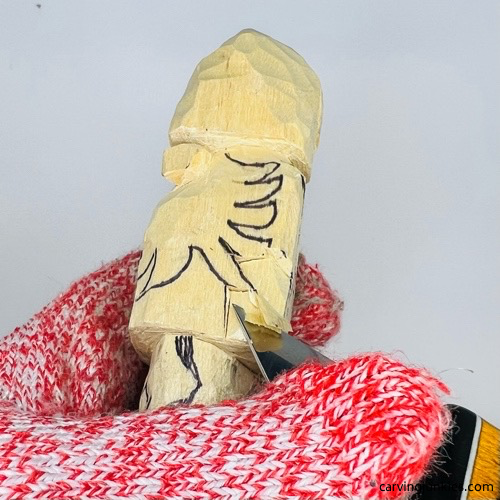 27. Slicing wood off
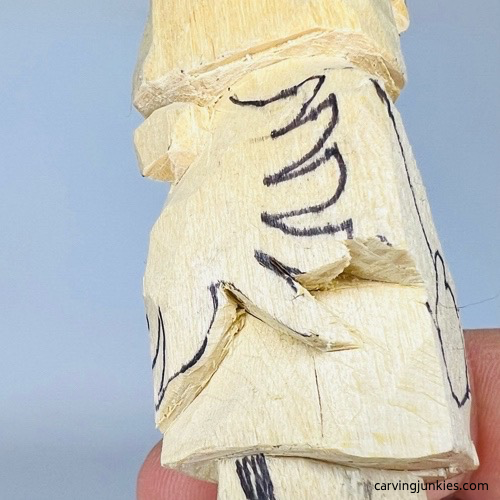 28. Desired depth of beard
Refine more details on the gnome carving
Keep working until the entire beard is separated (photo 29). Also separate the other arm on the front. Tip: You may have to outline the beard a second time to be able to remove enough wood to get the desired depth for the beard (photo 28). Clean up your cuts as you go.
Start to cut into the hat on both sides to create the gnome’s shoulders (photo 29). We also carved the hat brim down into the nose on the front.
Separate the arms on the back, including the mittens (photo 30). You can use stop cuts or line cuts; whatever is more comfortable for you.
Then, narrow the legs further (photo 31). Once the front legs are shaped, you can mirror your cuts on the back of the legs. Mark any additional wood that you need to remove on the back of the legs (photo 32).
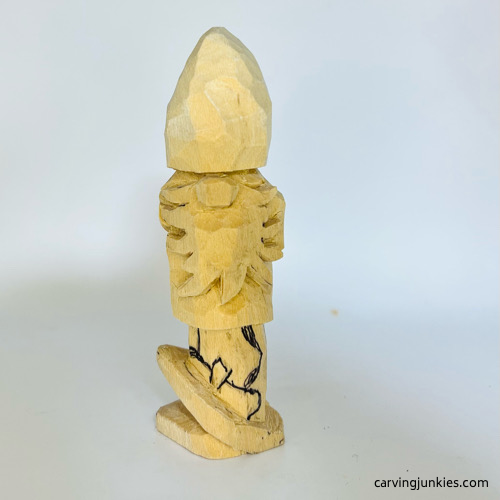 29. Beard is separated
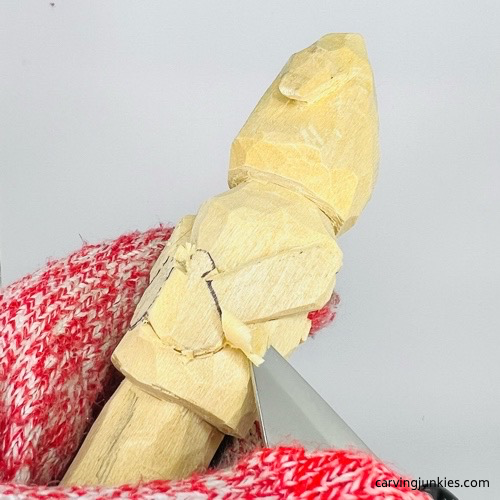 30. Shaping the back
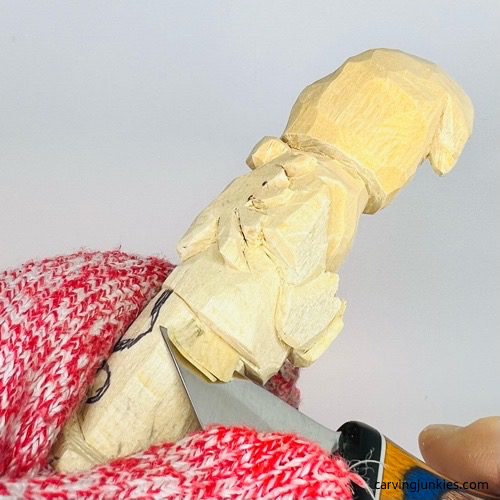 31. Narrowing legs
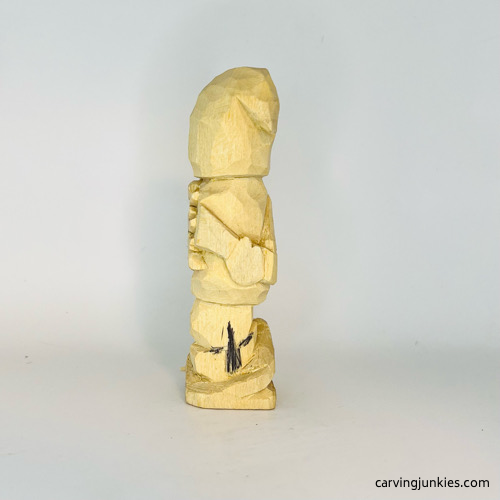 32. Back legs are marked
Shape the snowboard on your gnome carving
Carefully narrow and shape the snowboard. Take your time and refine your cuts all around (photos 33-36).
Draw a line about 1/4-inch (0.6 cm) up from the bottom of the hat (all around) that you will separate (we use stop cuts) to create the ribbed hat brim (photos 33-36).
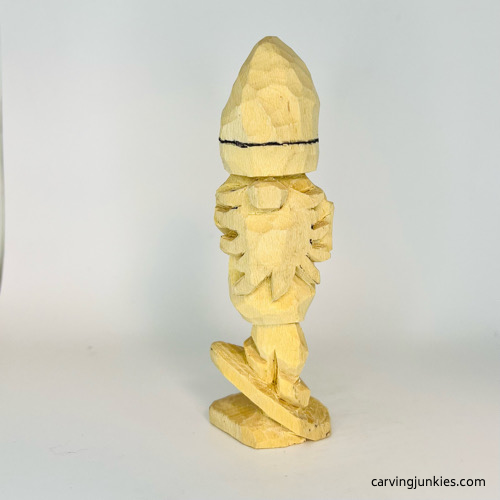 33. Details from the front
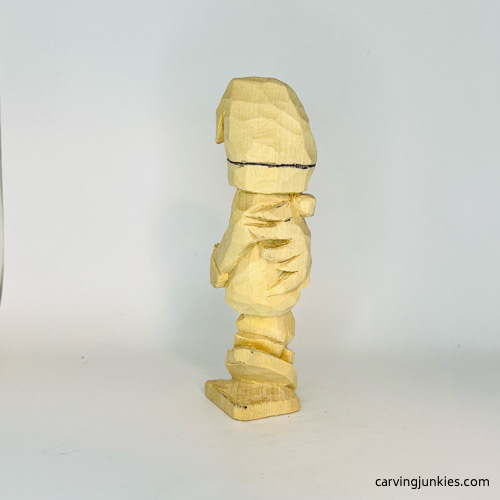 34. Details from the right view
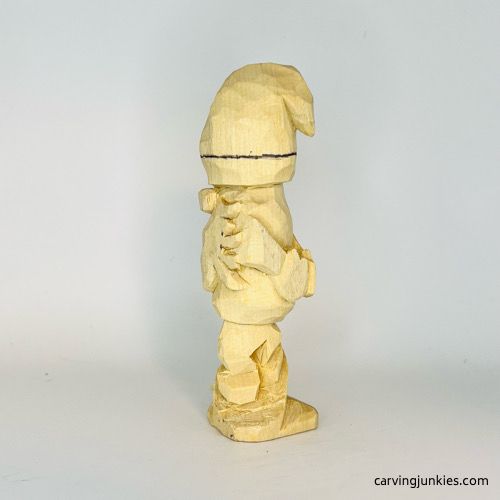 35. Details from the left view
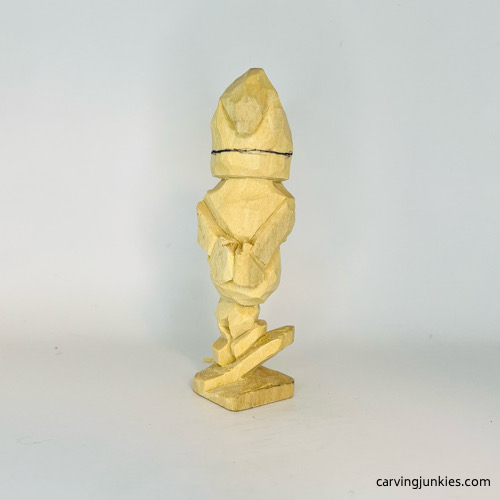 36. Details from the back view
Finish the details on your gnome carving
To texture the knit band on the hat and mittens we use a #47 V-tool (photos 37-40). We also added a knit band on the bottom of his sweater (see photo 39). Note: We wet our gnome carving so you could see all the details.
For the beard, we used a slightly wider #47 V-tool. Try to make your cuts in one direction, to give the beard a wind-swept look (photos 37-40). Vary the texture by using short and long cuts.
If you do not have a V-tool, you can make small V-cuts for the hat brim, mittens, and sweater with a very sharp detail knife. For the beard, alternate using short and long V-cuts and take your time. Or, you can skip the lines altogether with the beard, if you prefer.
Add a few wrinkles on the sweater, knees, and arms of the gnome carving. A few small V-cuts can be used to mark the straps on the boots (photos 37-40).
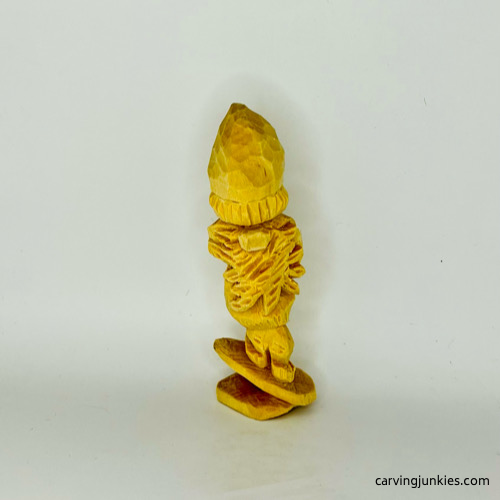 37. Front view of unpainted gnome carving
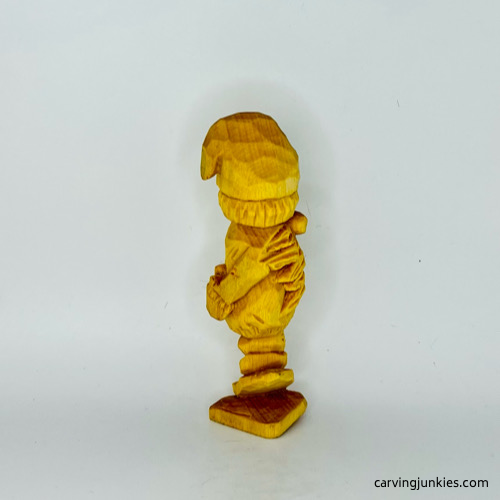 38. Right view of unpainted gnome carving
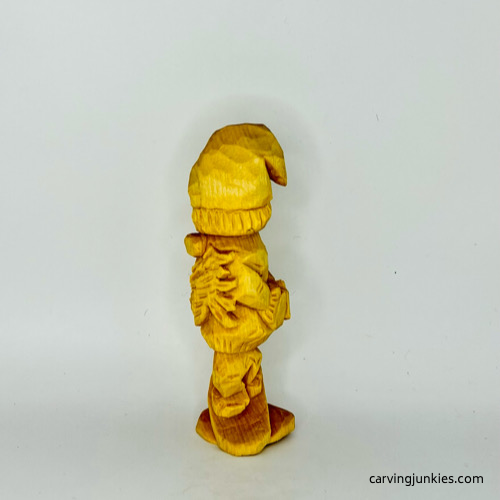 39. Left view of gnome carving
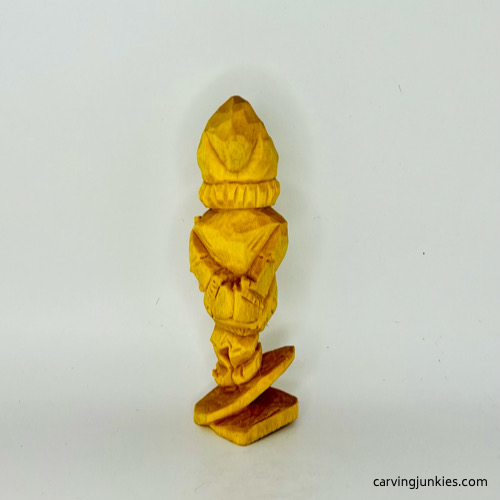 40. Back view of unpainted gnome carving
Paint your gnome carving
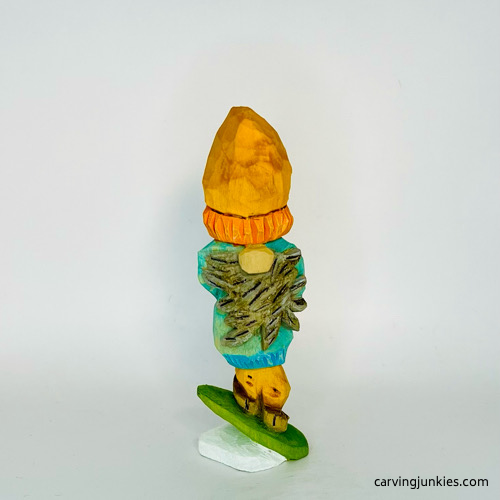 41. Painted gnome carving from the front
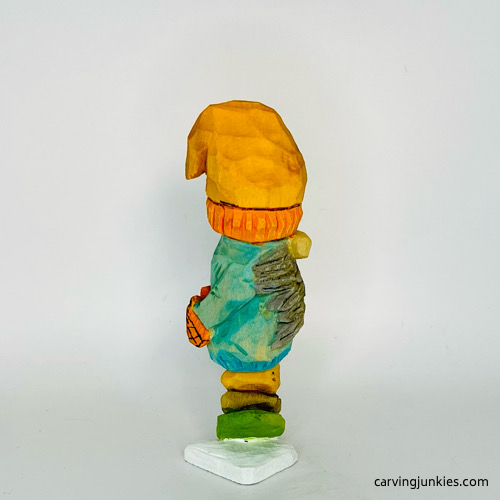 42. Right view of painted gnome carving
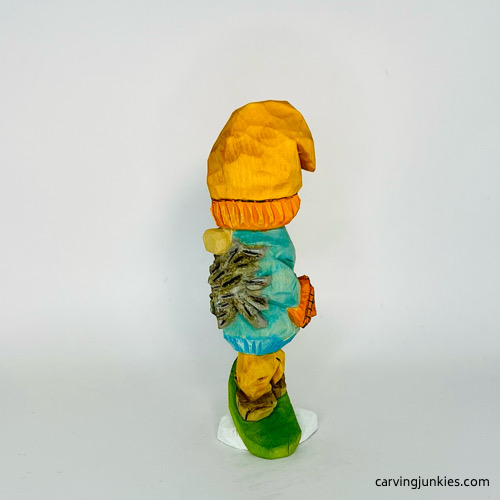 43. Left view of painted gnome carving
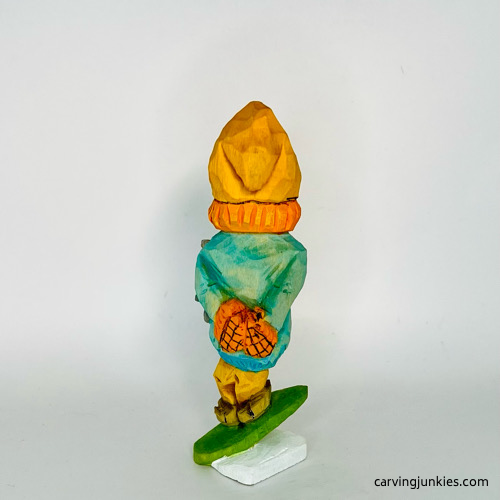 44. Back view of painted gnome carving
Like all of our wood carvings, we use acrylic paints and dilute them with water to create a wash. If you see 100%, it means we did not add any water.
Feel free to use whatever paint brushes you want. We tend to like flat brushes. Here are the colors and brands we used:
- Beard: Folk Art steel gray (100%).
- Pants and hat: Ceramcoat pumpkin. Knit hat band (100%).
- Base: Artist’s Loft titanium white (100%).
- Nose: Ceramcoat natural beige (100%).
- Sweater: Folk Art calypso sky. Knit sweater band: 100%.
- Board: Folk Art leaf green.
- Mittens: Ceramcoat pumpkin with black fine tip magic marker plaid.
- Line around hat: Black fine tip marker.
- Beard: dry brush with Folk Art antiquing medium (817).
- Finish: 1 drop of Folk Art antiquing medium (817) added to full well of water.
Free gnome carving pattern
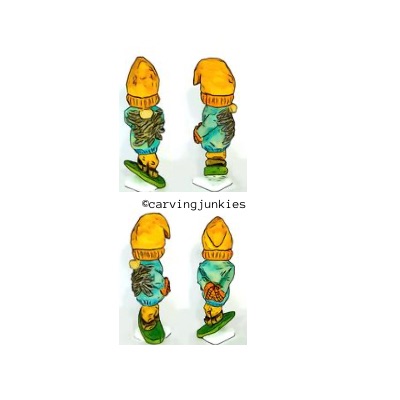
If you prefer to carve your gnome with a pattern, photocopy this to size to fit your wood block.
Gnome carving tutorial summary
- While a gnome carving without eyes is great for beginners, ours takes it up a notch by adding a tilted snowboard.
- A fine-point black magic marker is perfect for creating the plaid design (and easier to manage than paint).
- Check out our other gnome carvings, including our easier modern ski gnome and our more intricate old world gnome.
Get 50 Wood Carving & Painting Tips when you join our FREE Covered in Chips club.
Share this page
carvingjunkies.com never sells your personal information.
This site uses cookies for its operation and to enhance your experience. As an Amazon Associate and Focuser Carving affiliate we earn from qualifying purchases.
Home | About Us | Privacy Policy | Terms of Use | Contact | Sitemap
